I’ve always been a fan of unit tests because of their ability to give a developer peace of mind after fixing a bug or adding a new feature. It may seem tedious and repetitive to add them in the moment, but your future self will thank you for working on them when his time comes.
With that in mind, I decided to look into unit testing in Godot using GDScript. The most popular library for this seems to be GUT, which stands for Godot Unit Test. This post will cover my experience with installing and setup, as well as my initial impressions using GUT. I’ll be writing unit tests for my Priority Queue data structure implementation which I wrote about in a previous post.
Install
You can install GUT by downloading it from the in-editor AssetLib as GUT’s install wiki suggests. If you’ve never used the AssetLib before, it might take you a minute to find the AssetLib button on the editor. I added a screenshot of its location below
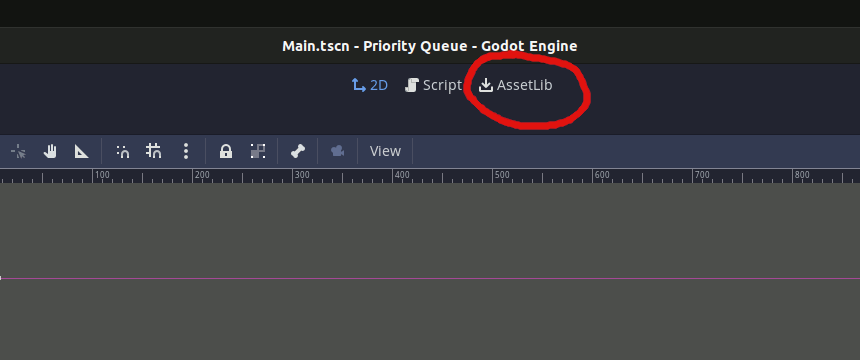
It took me a couple of minutes and a few Google searches to find that button.
However I prefer installing GUT using the second method:
- Manually download the zip from Godot Asset Library
- Copy only the gut directory into the addons directory of my project.
This saves me from having to find and delete the additional unnecessary files added to my project’s root directory that the first, in-editor, method of installing does.
Setup
Setup for GUI use can be done by following the wiki, and is fairly straightforward. One gotcha I ran into is that the default test file prefix is “test_”. As someone who prefers dashes to underscores in my filenames, I had to change it to just “test” so GUT can find my test files and run them.

Setup for command line use is also straight forward. I already had the binary for Godot 3.4 in my $PATH so to run all the tests via the command I have to invoke:
$ godot -d -s --path ./ addons/gut/gut_cmdln.gd -gdir=res://test/ -gprefix=test -gexit_on_success
Godot Engine v3.4.5.stable.official.f9ac000d5 - https://godotengine.org
OpenGL ES 3.0 Renderer: Mesa Intel(R) Graphics (ADL GT2)
../src/intel/isl/isl.c:2220: FINISHME: ../src/intel/isl/isl.c:isl_surf_supports_ccs: CCS for 3D textures is disabled, but a workaround is available.
OpenGL ES Batching: ON


 ---  Gut  ---
[INFO]:  using [/home/bt/.local/share/godot/app_userdata/Priority Queue] for temporary output.
Godot version:  3.4.5
GUT version:  7.4.1


res://test/test-minheap.gd.TestOtherAspects
* test_assert_true_with_true
1/1 passed.


res://test/test-minheap.gd.TestSomeAspects
* test_assert_eq_number_equal
1/1 passed.


*** Run Summary ***
All tests passed

Totals
Scripts:          1
Passing tests     2
Failing tests     0
Risky tests       0
Pending:          0
Asserts:          2 of 2 passed

2 passed 0 failed.  Tests finished in 0.0s
I then used the -gprint_gutconfig_sample option to print out a json that I can use for a res://.gutconfig.json file. When using the -gprint_gutconfig_sample option, make sure to scroll up past the empty config sample to see the json you actually need.
Here is my res://.gutconfig.json file:
{
 "dirs": ["res://test/"],
 "include_subdirs": true,
 "prefix": "test",
 "should_exit": true,
 "suffix": ".gd"
}
You don’t need to have every config option in your file. Additionally, I found that setting "should_exit": true is better in command line mode so you don’t have to hunt for the GUT window to close it before re-running the test.
With the res://.gutconfig.json file, which GUT automatically reads, invocation becomes simpler:
$ godot -d -s --path ./ addons/gut/gut_cmdln.gd
Initial Impressions
The first thing I noticed after installing GUT is that all of its scripts now show up in my Quick Open menu.
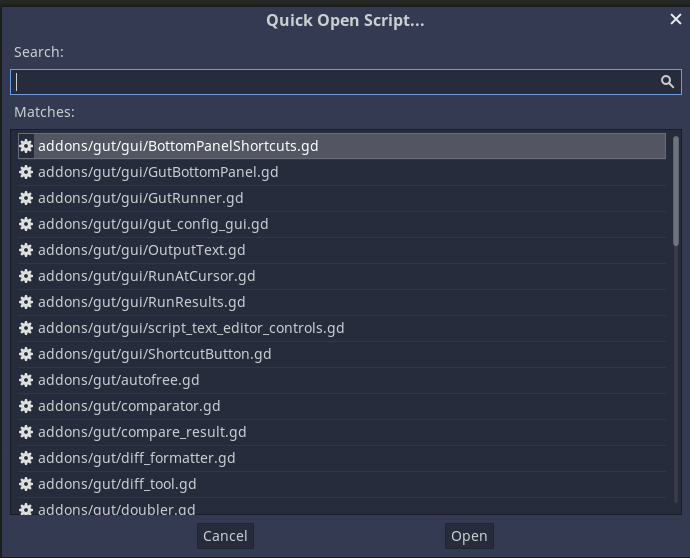
This isn’t the fault of GUT itself, any addon added to your project with a bunch of files suffixed with .gd will pollute your Quick Open menu. There doesn’t seem to be a way to add an ignore list to Quick Open in Godot. This is unfortunate, and is something I’ll just have to live with for now. Hopefully Godot 4 will have a solution.
As far as writing tests, the API GUT exposes is really nice with a lot of features, like setup and teardown methods, Doubles, Stubs, and parameterized tests. Here is the test I wrote for my Priority Queue.
extends GutTest

class TestRandom:
	extends GutTest

	var binary_heap: Reference
	var random_vectors: Array
	var expected: Array

	func before_each() -> void:
		binary_heap = PriorityQueue.new()
		expected = []
		var rng = RandomNumberGenerator.new()
		rng.randomize()
		# Generate random vectors
		var n: int = 100
		random_vectors = []
		for i in n:
			# Generate a float randomly
			var random_f: float = float(rng.randi_range(0, n))
			# To keep things simple, just make the x,y and cost all the same
			var element: Vector2 = Vector2(random_f, random_f)
			random_vectors.append(element)

		for v in random_vectors:
			binary_heap.insert(v, v[0])
			expected.append(v[0])

		expected.sort()

	func test_extract_is_sorted() -> void:
		for f in expected:
			var v: Vector2 = binary_heap.extract()
			assert_eq(v.x, f)

	func test_empty() -> void:
		for f in expected:
			binary_heap.extract()
		assert_true(binary_heap.empty())

class TestPreDefined:
	extends GutTest

	var test_params = [
		[0.0, 0.0, 0,0, 0.0],
		[1.0, 0.0, -1.0, 0.0, 1.0],
		[-4.0, -3.0, -2.0, -1.0],
		[4.9, 3.8, 2.7, 2.6, 1.5, 3.1],
	]

	var binary_heap: Reference
	var expected: Array

	func before_each() -> void:
		binary_heap = PriorityQueue.new()
		expected = []

	func test_extract_always_returns_min(p=use_parameters(test_params)) -> void:
		var v: Vector2
		for f in p:
			print("This is f ", f)
			v = Vector2(f, f)
			binary_heap.insert(v, f)
			expected.append(v)
		# Sort the test param using the built-in
		expected.sort()
		for ev in expected:
			v = binary_heap.extract()
			assert_eq(v, ev)
I was able to create a pretty robust set of tests with only a few lines of code.
Overall I am pretty happy with GUT. I am excited to try it with more advanced scripts attached to actual Godot scenes. I expect the Doubles and Stubs to be very handy for those. I will write another post about that experience in the future.